How to build production and preview static sites with Netlify
Netlify lets you run automated builds of your website with each Git commit using CI/CD pipeline designed for web developers. Netlify can generate and publish production and preview sites with every push. You can also trigger these builds by content changes in Kontent using webhooks.
Netlify and Kontent: automatically rebuild your static site
Sites powered by static site generators bring undoubtedly a lot of advantages for programmers, editors, and users. One small drawback is the necessity to rebuild your project with every content change in Kontent.
Automated site rebuilding is an essential feature of every static site. You can implement it by leveraging Kontent's webhooks and Netlify's build triggers.
Build production site and preview site
In this tutorial, you'll learn how to use Netlify to run a static site that's built and published with every content update. You'll also find out how to use the Delivery Preview API to build a preview site with content you haven't published yet. Building and deploying are done automatically using Kontent's webhooks and Netlify's build hooks.
You'll have two separate sites on Netlify, each of them based on your production master or main branch code:
- The first one is a site with published content. It's rebuilt with every content publish or unpublish.
- The second one is a preview site with content you haven't published yet that's fetched using the Delivery Preview API. This site's rebuilt when content is created, updated, or deleted. You'll also learn how to protect the preview site against unauthorized access.
Glossary
Build hooks are URLs you can use to trigger new Netlify builds and deploys.
Webhooks are programmatic notifications that let your application – in this case, Netlify – know when something changes in your Kontent project.
Build a site with published production content
In this section, you'll learn how to build your production site with published content using your production master or main branch.
Before you start
For this scenario, you need to have prepared one statically generated site. The site must be already deployed to Netlify and configured for continuous deployment. The site needs to fetch content from the Delivery API. Git providers supported by Netlify are Bitbucket, GitHub, and GitLab. Learn more about linking your repository in Netlify.
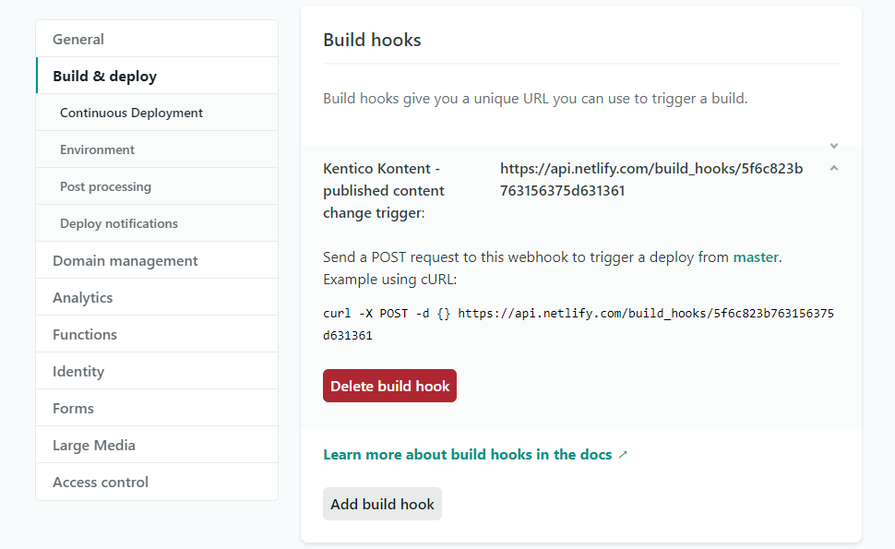
Create a build hook trigger in Netlify
- In your Netlify production site settings, go to Build & Deploy > Continuous deployment.
- Under Build hooks, click Add build hook.
- Type the build hook name
- Select your production branch (typically master or main).
- Save the build hook.
- Copy the trigger URL.

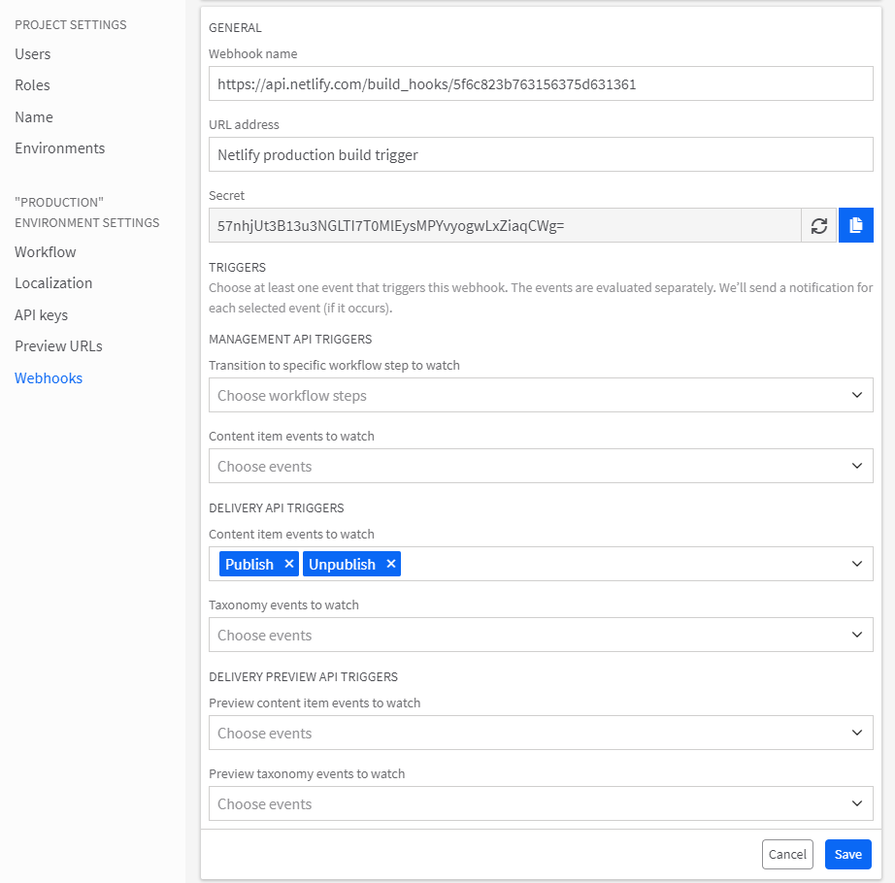
Register the Netlify's build hook in Kontent
- In Kentico Kontent, go to {@icon-settings|Project settings@}.
- Under Project settings, select Webhooks.
- Click Create new Webhook.
- Type a name for the webhook.
- Paste the URL of the hook trigger provided by Netlify into the URL address.
- Adjust the Delivery API triggers.
- Typically you'd want to trigger the webhook when your content is published or unpublished.
- Click Save.

Now, your production site will be automatically built and deployed with the latest content on Netlify after every publish and unpublish in Kontent.
Build a preview site
In this scenario, you'll learn how to build a preview site using your production branch with content you haven't published yet. You can protect this site with a password and use it to preview changes before you release them publically.
Before you start
To build a preview site, you need to use a second statically generated site that's already deployed to Netlify and configured for continuous deployment. This site needs to use the same repository as the production site but, unlike the production site, it needs to use the Delivery Preview API to fetch the content.
Distinguish between Delivery API and Delivery Preview API in your code
Distinguishing between the Delivery API and the Delivery Preview API depends on the used static site generator and the overall logic of your code. The most reasonable approach is to distinguish them using environment variables. The example below uses Gatsby.js static site generator with @kentico/gatsby-source-kontent plugin. The gatsby-config.js uses the Delivery Preview API if its key is provided in the respective variable.
{
    resolve: '@kentico/gatsby-source-kontent',
    options: {
      projectId: process.env.KONTENT_PROJECT_ID,
      usePreviewUrl: process.env.KONTENT_PREVIEW_ENABLED && process.env.KONTENT_PREVIEW_ENABLED.toLowerCase() === 'true',
      authorizationKey: process.env.KONTENT_PREVIEW_ENABLED && process.env.KONTENT_PREVIEW_ENABLED.toLowerCase() === 'true'
        ? process.env.KONTENT_PREVIEW_KEY
        : undefined,
      languageCodenames: ['en-US'],
    },
}
This allows you to have one master or main branch you can use to build production and preview sites using different Delivery API endpoints according to the provided environment variables.
Set Netlify environment variables
- In your Netlify preview site settings, go to Build & Deploy > Environment.
- Under Environment variables, fill in the variables according to your app logic.
- In the gatsby-config.js above, these variables are
KONTENT_PREVIEW_ENABLEDandKONTENT_PREVIEW_KEY. - You can find your Delivery Preview API key in the Kontent's Project Settings.
- In the gatsby-config.js above, these variables are
- Save the changes.


Create a build hook trigger in Netlify
- In your Netlify preview site settings, go to Build & Deploy > Continuous deployment.
- Under Build hooks, click Add build hook.
- Type the build hook name
- Select your production branch (typically master or main).
- Save the build hook.
- Copy the trigger URL.

.png?w=895&h=524&auto=format&fit=crop)
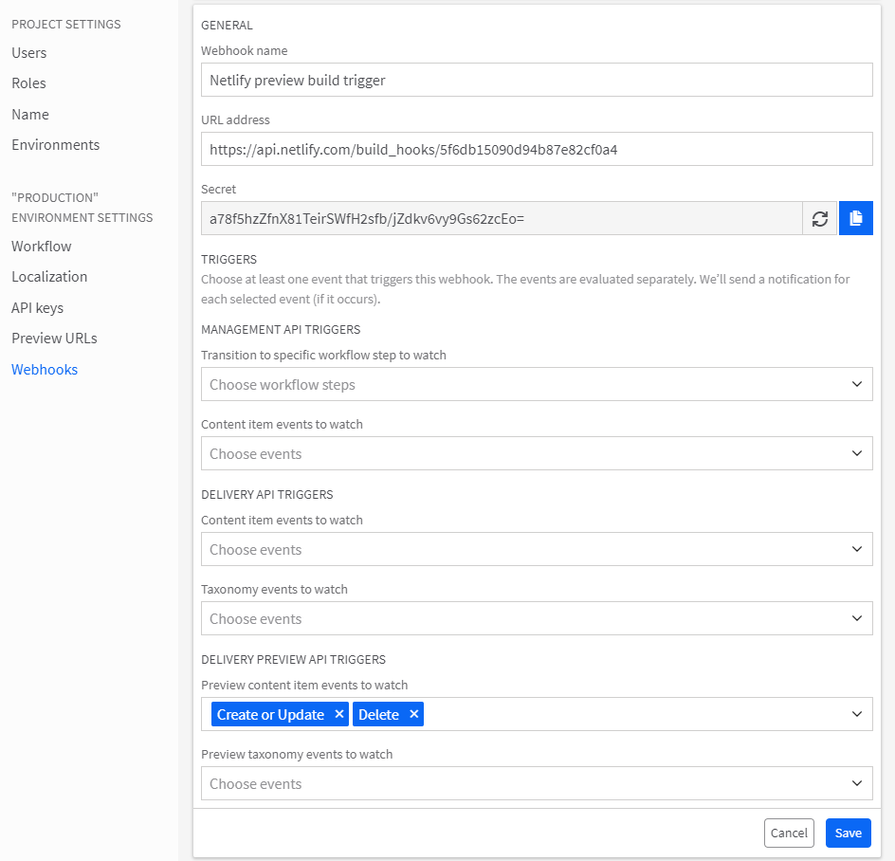
Register the Netlify's build hook in Kontent
- In Kentico Kontent, go to Project settings.
- Under Project settings, select Webhooks.
- Click Create new Webhook.
- Type a name for the webhook.
- Paste the URL of the hook trigger provided by Netlify into the URL address.
- Adjust the Delivery Preview API triggers.
- Typically you'd want to trigger the webhook when your content is created, updated, or deleted.
- Click Save.

Now, your preview site will be automatically built and deployed with the latest content on Netlify every time you add, edit, or delete something in Kontent.
Secure your preview site
Unless you want to show your content drafts and development tests to the whole world, it's essential to restrict the access to your preview site only to authorized people. To do that, use Netlify's password protection to hide your site behind a password that you control.
Next steps
You've learned how to create a static site on Netlify that'll get updated with every content publish and unpublish you do in Kontent. You also know how to create a password-protected preview site on Netlify for content and development testing.
This tutorial demonstrated the capabilities in combination with Gatsby.js. A similar approach can be used for the majority of other static site generators, such as Next.js.
You can empower your developers and editors to preview published or unpublished content with non-production branches with Netlify's deploy previews.
Originally published at docs.kontent.ai.