Sourcebit: How to make friends with various data sources in the Jamstack?
Choosing the correct technology for a software project or a website brings a lot of difficulties. Once you get used to working with one specific stack, you tend to prioritize it for everything. In my experience, itʼs pretty common that a project was built using the specific platform just out of habit. Moreover, when the dev team finally makes the switch to the different platforms, they are forced to rewrite the project — essentially to throw the work away and start it from scratch again.
There is also another extreme, where the project is also shipped built on the original platform. As a result, there are new, greenfield projects built on top of old platforms and technologies just because of a lack of innovation (wink-wink younger me messing with Objective-C instead of using shiny new Swift).
This is even more evident in web development and the JavaScript world. There are new frameworks emerging and quietly deprecating almost on a daily basis. It might seem that itʼs not only a waste of time trying to examine new technologies, but itʼs also impossible to keep up. Itʼs no different with static site generators and the whole Jamstack ecosystem. Mastering the combinations of all the available CMSs with possible static site generators sounds like a hopeless initiative.
There must be some way to simplify and unify all the different content management systems, data sources, and static site generators, right?
Data normalization simplifies everything into the Lego pieces
When I was a child, there was no PlayStation or Netflix and my most favorite way of spending time was playing with building blocks. Over time Iʼve collected many various kits made by different makers of different materials and shapes.


Who would have thought that many years later Iʼd be solving the same problem with Jamstack components? Only now we call it interoperability, compatibility, different contract, or vendor lock-in.
All these terms are quite a wide-spread concept not only in software development. Wouldnʼt it be awesome if there was a way to unify and connect data contracts of various content management systems (with different APIs, SDKs, and clients) with diverse static site generators? A way that would not expect you to dive into details with every combination of various data sources and front-end frameworks? Thatʼs what Sourcebit aims to do. Turn all these components into compatible Lego pieces and let you play.
What is Sourcebit?
Sourcebit is the open-sourced, MIT licensed platform that provides data normalization, transforming, and connecting of various content management systems and target static site generators and front-end frameworks. Without it, youʼd have to fetch content from the CMS using API or SDK and process this data into the target platformʼs specific contract.
There are many CMSs that could be used, such as Contentful, Kontent, or even Wordpress. All these CMSs have different outputs, APIs, and SDKs. There are also many popular static site generators that are widely used such as Hugo, Jekyll, or Next.js. Each of these utilizes the building process using a specific platform—JavaScript, Go, or Ruby. Each of these also might work with data in a different format—Markdown, Frontmatter, JSON, YAML, or HTML. Sourcebit and its plugin ecosystem do this all for you so you can focus on developing the project.
How does Sourcebit work?
Sourcebit works with three different types of plugins—source, transform, and target. They are responsible for getting, transforming, and normalizing data, respectively.
The source plugin is responsible for retrieving and normalizing data from the data source, typically a CMS. Transform plugins handle specific data transformation, for example, persisting remote assets and media files locally. And finally, target plugins get all these normalized data and transform them into the format which is required by the chosen target framework or static site generator. The concept is open and extensible. Apart from using the out-of-the-box plugins, you can develop your own one. The guys from Sourcebit have described the whole plugin concept very clearly on their wiki.
Smooth configuration
Every time I want to evaluate the new platform, service, or framework, itʼs a hellish endeavor to configure the service properly just to get a simple proof of concept. Surprisingly, configuring Sourcebit is a pleasant experience. Personally, this is my most favorite part of Sourcebit. Sourcebit provides this neat interactive wizard that does all the hard work for you.

Yes, you can still create a whole config file by yourself, specifying all the identifiers, plugins, and data transformations by hand. But why would you do that?
The whole idea sounds nice... but how does it really work?
To show you how Sourcebit really works, letʼs try to migrate static content hardcoded in markdown files into a headless CMS instead. For this example, I used Kentico Kontent, however, you can use any of the supported Sourcebitʼs source plugins.
For demonstration, we couldʼve built the whole site from scratch, nevertheless, this article is not about the specifics of Jekyll, Hugo, or Next.js, so I've chosen an already existing blog template from https://jamstackthemes.dev (a very good source of inspirational templates, indeed!). This page is built with Jekyll. Having said that, the same principles would apply for the Hugo or Next.js target plugins and sites.
You can find the running output of the following recipe deployed on Netlify. The recipe for this task is really straightforward:
- Fork the project and migrate content into the CMS.
- Configure Sourcebit to get and normalize content from the CMS.
- Fetch content and run the project locally.
- Configure and deploy the site to Netlify.
- Configure the rebuilding site when content is changed in the CMS.
Note: You will need to have Node.js, npm, and Jekyll installed to run the project locally. If you get stuck somewhere in the code or tutorial, you can check the completed example repository on GitHub.
1. Fork the project and migrate content into the CMS
- Fork the project on GitHub.
- Clone your forked repository locally with
git clone https://github.com/<your_handle>/tale.git. - If you examine the code closely, you can spot that the content of the site is located in the _pages and _post directories. We need to copy this content into Kentico Kontent.
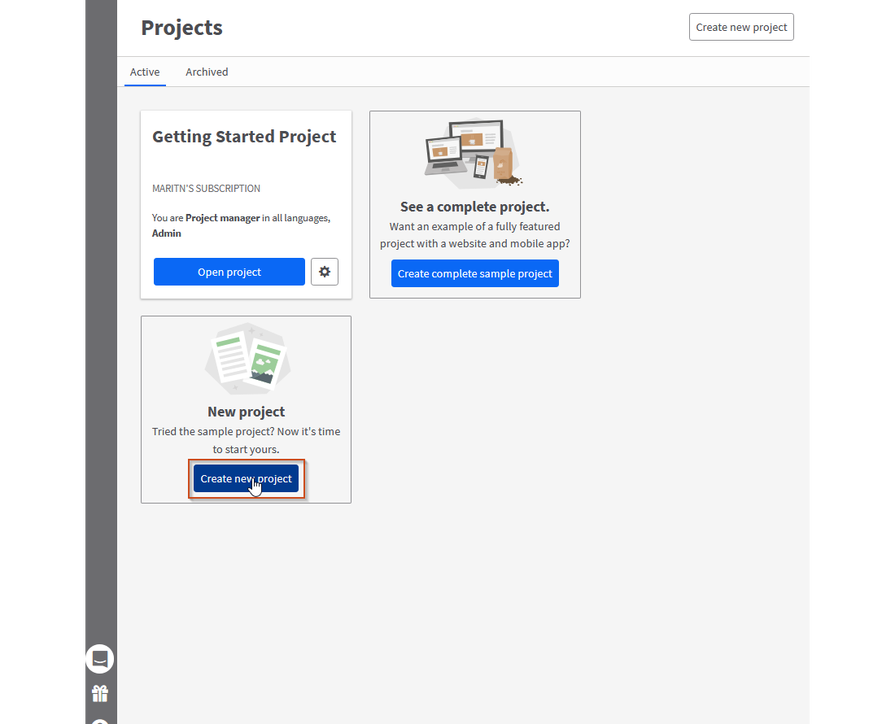
- Go to the Projects section and create a new project in Kontent.

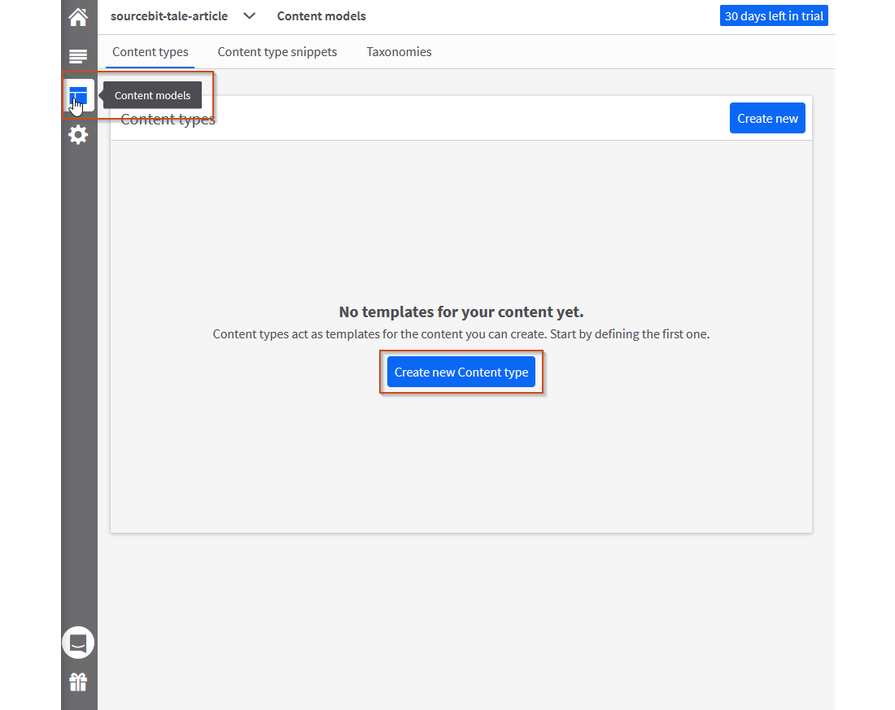
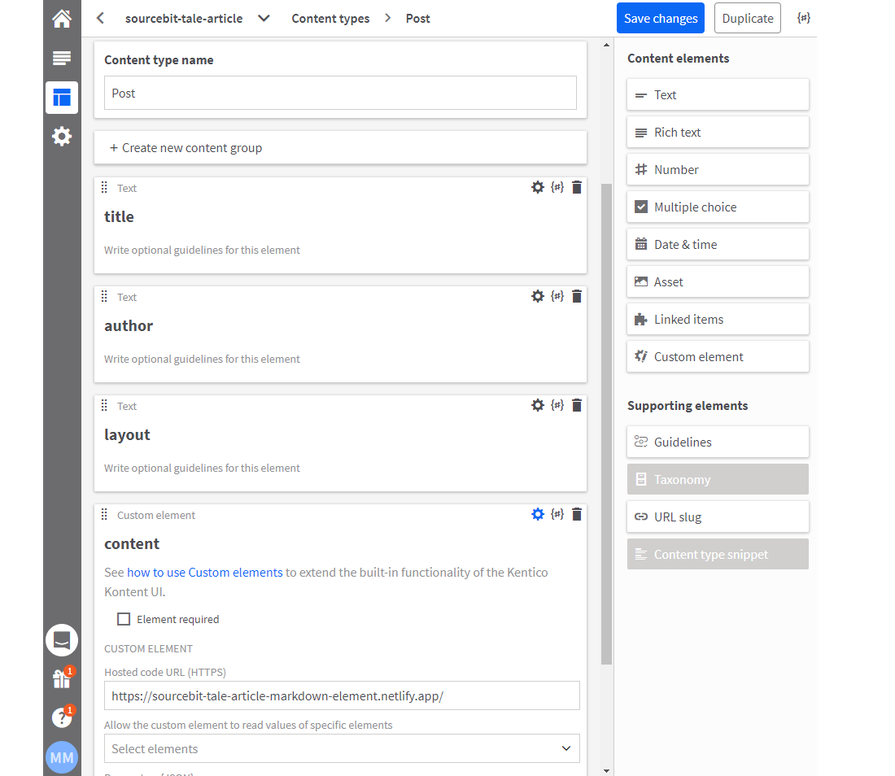
- Go to the Content Models section, create Page Content Type.

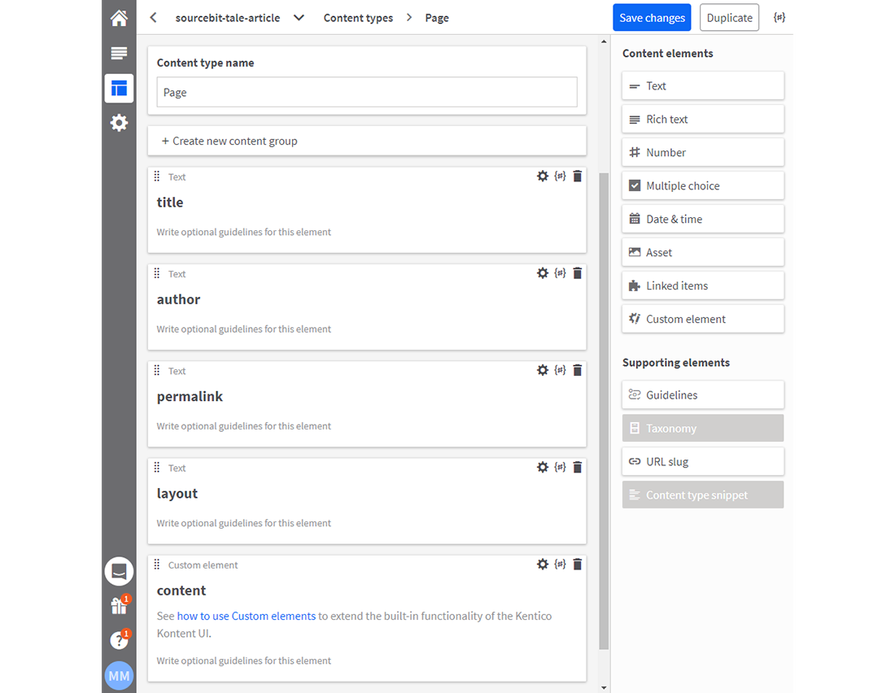
- Add the title, author, permalink, and layout text elements. Since this Jekyll website uses markdown format for the content, also add a markdown custom element with the content name. Iʼve already prepared my markdown custom element for you—you can use my URL—
https://sourcebit-tale-article-markdown-element.netlify.app/or fork the original repository and deploy it to Netlify. (You can learn more about custom elements in documentation for kontent.ai.)

- Create Post Content Type with title, author, and layout text elements. For the content, weʼll need a markdown custom element again. Create a custom element with your markdown editor URL.

- In the Content & Assets section, create a page and posts—just copy and paste content from static files (from _pages and _posts directories) into Kontent.
2. Configure Sourcebit to get and normalize content from the CMS
- Since the content will be fetched by Sourcebit and Kontent Source plugin, we wonʼt need any hardcoded static content anymore. Delete _pages and _posts directories in your project. You should also add them to the .gitignore file.
- Letʼs configure Sourcebit. At the root of the website project, run
npx create-sourcebitcommand to start the interactive command-line configuration. You can move between items with your arrow keys, selecting the option with the Space bar, confirming with the Enter key. - Select
@kentico/sourcebit-source-kontent (by Kentico): A Kontent source plugin for Sourcebitand confirm. - In this example, we wonʼt need transforming assets, so just skip this step with the Enter key.
- Select
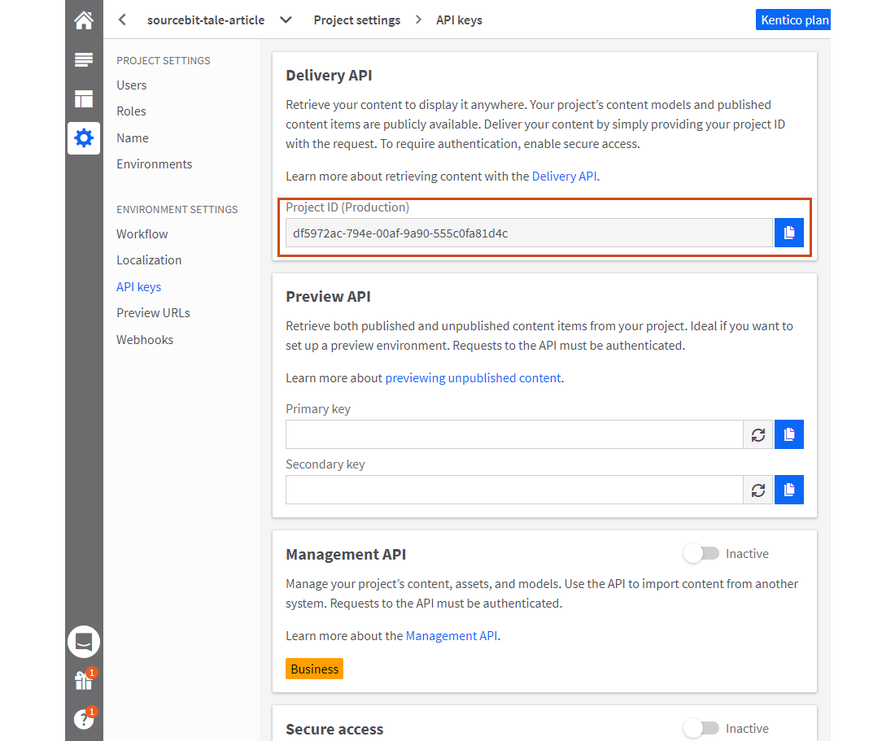
sourcebit-target-jekyll (by Stackbit): A Sourcebit plugin for Jekyll target pluginand confirm. - Enter Kontentʼs project projectId and confirm. You can find your projectId in your project in Project Settings -> API keys section.

- Enter the
defaultlanguage and confirm. - Configure Models/Content Types according to the screen.

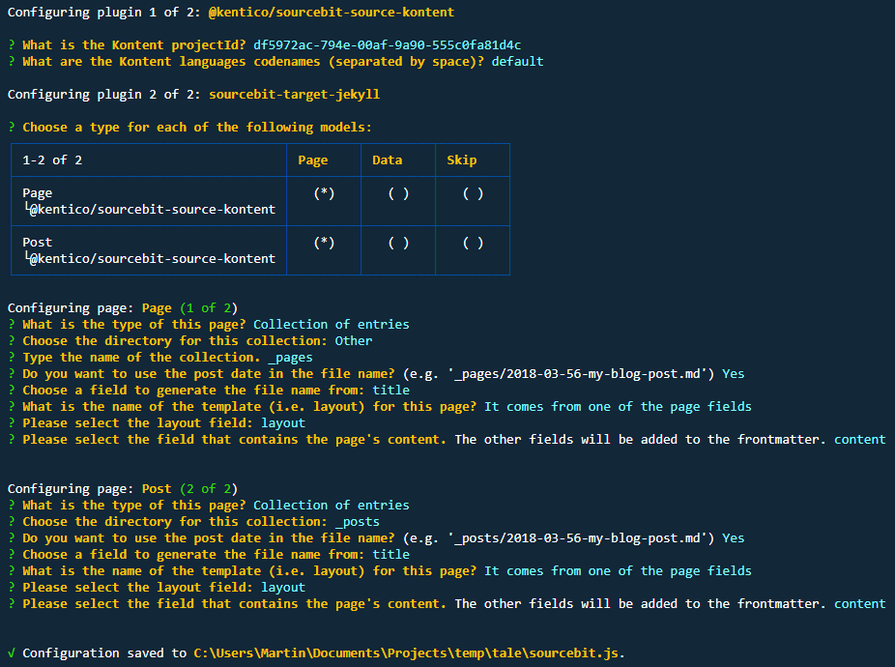
After finishing the interactive wizard, note the newly created file named sourcebit.js. This is a config file for Sourcebit that defines how to fetch, transform, serialize, and use the content. Once you change the structure of your project or data in your CMS, you can walk through the interactive wizard again to generate a new config, or you can just edit this file. The whole Sourcebit configuration is also in a .gif provided in the Smooth Configuration section.
3. Fetch content and run the project locally
- Run
sourcebit fetchcommand. Now Sourcebit will fetch all the data from the CMS and store them into already defined directories according to our generated Sourcebit.js config. - You can run the site locally with
jekyll servecommand. Now the site is using data from Kontent.
4. Configure and deploy the site to the Netlify server
In this step, we are going to configure the Netlify build.
- Add deploy script to the scripts section of the package.json.
"deploy": "npm install && sourcebit fetch && bundle install && bundle exec jekyll build". This will install all the necessary dependencies, fetch and normalize all the data, and build Jekyll site. - Create a file with the .ruby-version name with the version of Ruby. In my case, itʼs
2.6.2. - Since we want to run the site in the root of the webserver, remove
baseurlfrom _config.yml. - Push all the changes.
- Log in to Netlify and create New site from Git with existing GitHub repository.

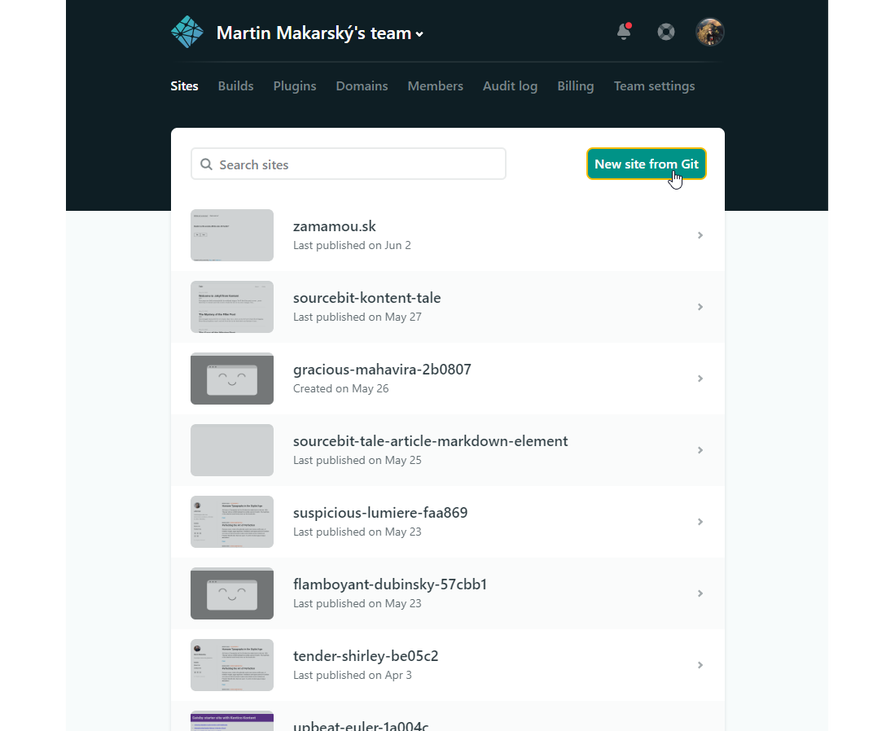
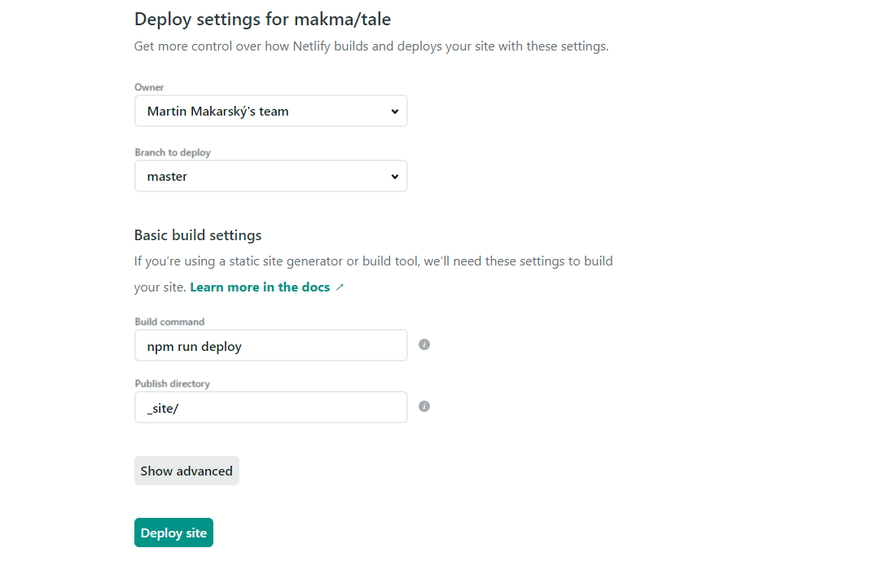
- In the Netlifyʼs user interface, select the
masterbranch to deploy, enternpm run deployas build command,_site/as publish directory, and deploy the site. After a successful build, your site will be deployed and publicly available on Netlify.

5. Configure the rebuilding site when content is changed in the CMS
Now weʼve got our site deployed with the content that is not hardcoded but fetched dynamically from the CMS. However, when the content is updated in the CMS, changes are not reflected on the deployed site yet. To achieve this, we have to trigger a new Netlify build once the content is changed in the CMS.
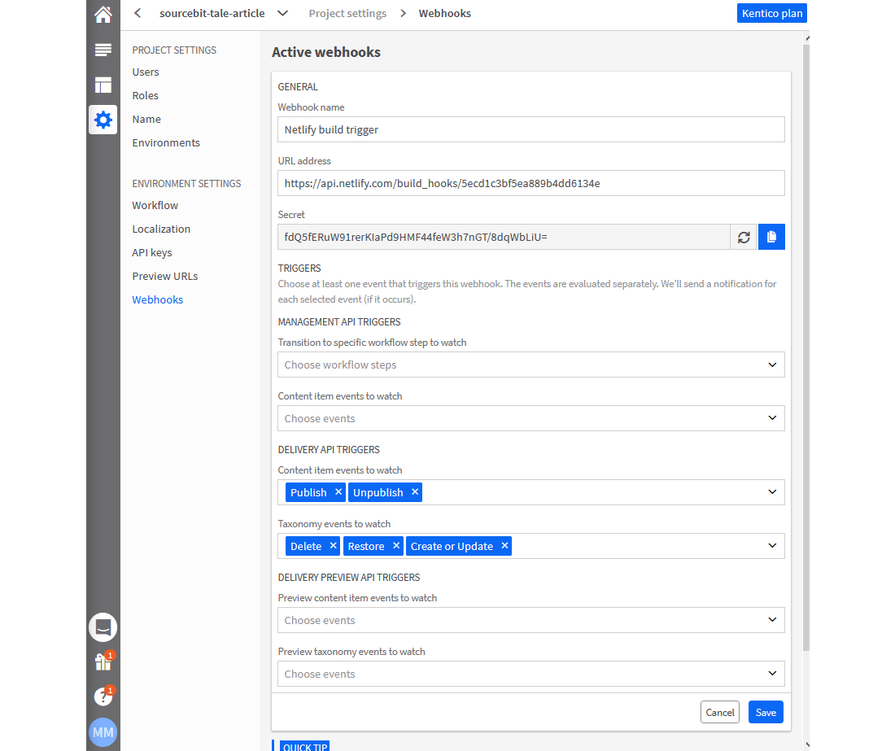
- In the Netlify interface, go to settings of the site, to the Build hooks section, and click Add build hook. Name your hook, e.g., Kontent.ai content update, save and copy generated URL.
- Go to app.kontent.ai to your project to Settings -> Webhooks and create a new webhook. Paste the already copied webhook URL address into the URL address field and name your webhook, e.g., Netlify build trigger. Save the changes.

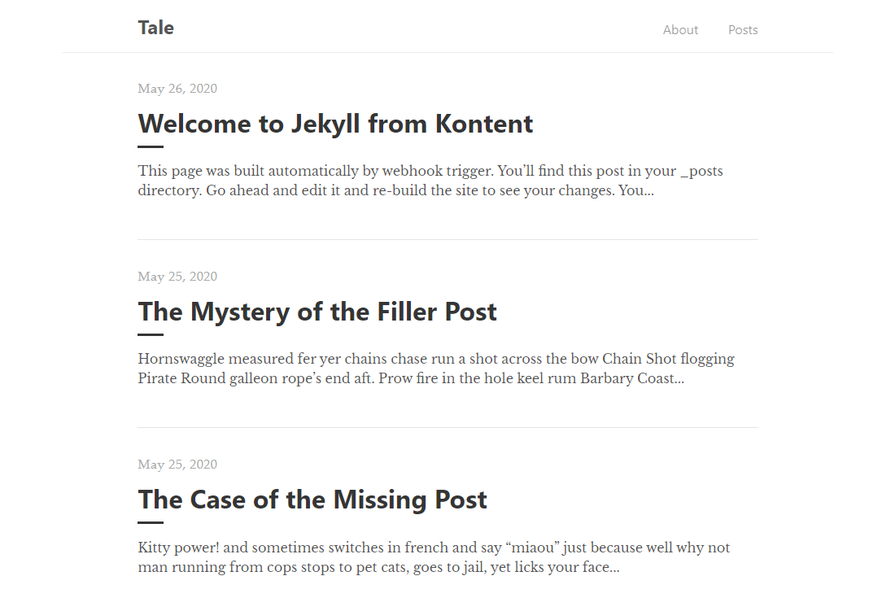
- When you change the content in the CMS now, after publishing the item, the webhook will be triggered, and your site will be rebuilt with the updated content.

Whatʼs next?
With the Sourcebit and available plugins, itʼs simple to connect numerous data sources with the target platform even without custom fetching and normalizing logic. This makes it simpler and cheaper to develop web sites for various front-end frameworks and static site generators.
I believe Sourcebit can change the way people develop Jamstack sites. Moreover, from the vendorʼs point of view, Sourcebit might be a great alternative to implementing the ecosystem for each target platform.
This was just a shallow example of Sourcebit capabilities with just one source and one target plugin. There are more things to explore such as Hugo or Next.js target platforms, watching and previewing unpublished changes, multilingual sites, or even asset transformations. Another whole new level of challenge is creating your own custom plugin—you can take a look at mine and let me know your thoughts on Twitter.
Originally published at kontent.ai.